How Potentiometers Expand Arduino UNO R4 Capabilities
July 3rd, 2024
00:00

00:00
Summary
- Explains potentiometer as a variable resistor for device control
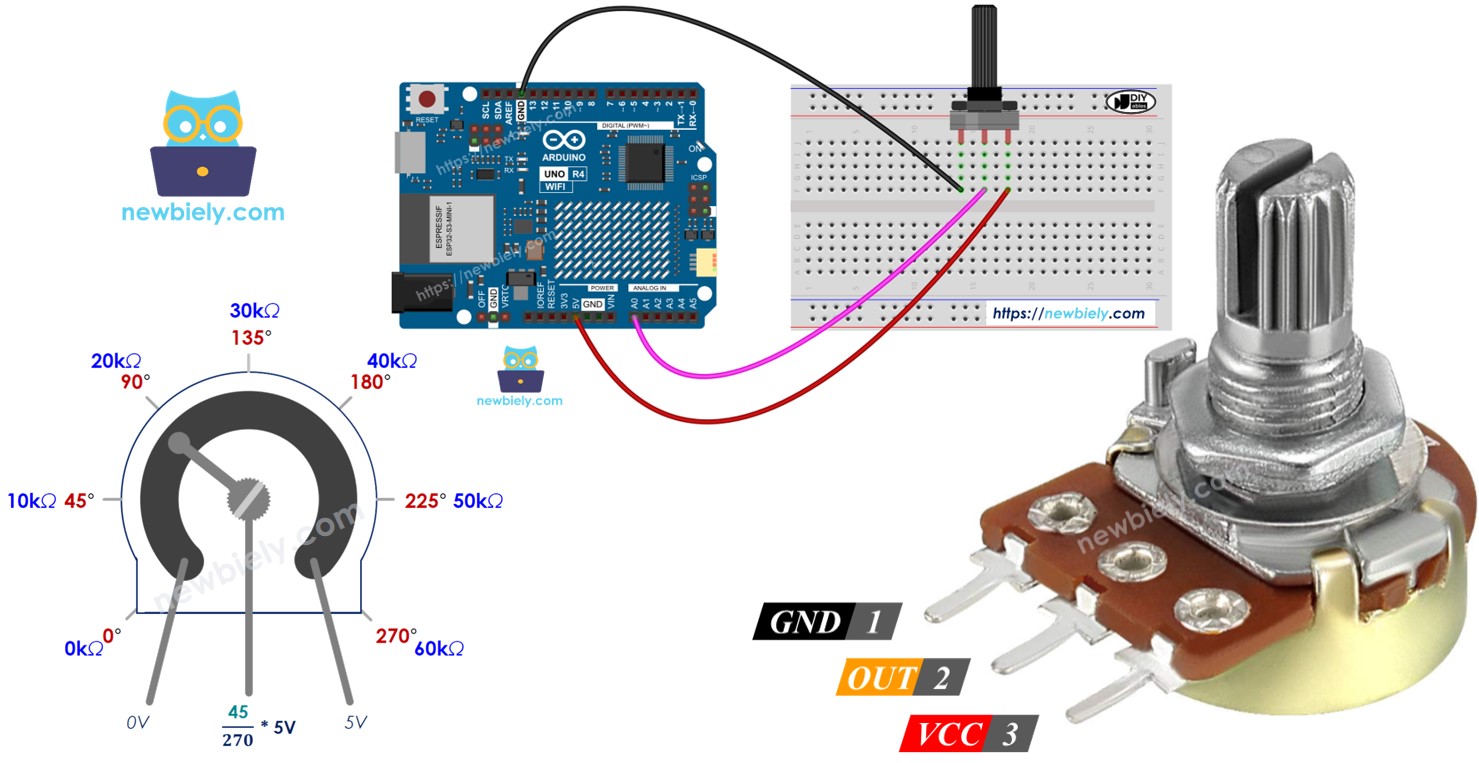
- Details three-pin configuration and Arduino UNO R4 interface
- Describes voltage output changes from shaft rotation
- Discusses applications like volume and motor speed control
- Includes guide to program Arduino for reading potentiometer values
Sources
In the realm of electronics and interactive projects, the Arduino UNO R4 serves as a cornerstone for hobbyists and professionals alike. Its versatility is highlighted when interfaced with a component as fundamental as the potentiometer—a variable resistor that is essential in the control of devices by adjusting voltages. The potentiometer, or rotary angle sensor, is instrumental in the manual adjustment of various settings. It might regulate the volume of a stereo system, modulate the brightness of a lamp, or alter the zoom level of an oscilloscope. These applications are made possible due to the potentiometer's simple yet effective three-pin configuration: the ground pin, commonly referred to as GND, which connects to zero volts; the VCC pin, which connects to the power supply, be it five volts or three point three volts; and the output pin, which communicates the voltage to the Arduino UNO R4's input pin. An intriguing aspect to note is that the GND pin and the VCC pin can be interchanged, offering flexibility in certain situations. The operation of the potentiometer is straightforward. The shaft rotation ranges from zero degrees—positioned closest to the GND—to a maximum angle known as ANGLE_MAX, positioned closest to the VCC pin. As the shaft is turned, the voltage at the output pin experiences a proportional variation, commencing from the ground voltage and ascending to match the VCC's voltage. At zero degrees, the output pin will read zero volts, whereas at ANGLE_MAX, it will reflect the full voltage supplied by the VCC. For angles in between, the output voltage can be calculated by the formula: output voltage equals the angle multiplied by VCC divided by ANGLE_MAX. The Arduino UNO R4, equipped with analog input pins labeled A0 to A5, has the capability to convert the variable voltage received from the potentiometer into a digital signal that the microcontroller can interpret and utilize. These pins transform the input voltage, which spans from zero volts to VCC, into a digital representation—values ranging from zero to one thousand twenty-three, known as ADC values or analog values. By linking the potentiometer's output pin to one of the Arduino's analog inputs, a user can program the device to read the ADC value and convert it into various usable forms. However, it's important to understand that the value the Arduino reads is not an angle or voltage; instead, it is an integer within the zero to one thousand twenty-three range. This ADC value can be converted into an angle or voltage, but far more commonly, it is transformed into a controllable value. This might represent the volume level of a stereo system, the intensity of a light, or the speed of a motor. Such transformations often require the rescaling of the ADC range to match the specific needs of the application at hand. To harness the full potential of this setup, programming the Arduino UNO R4 is a crucial step. The code written and uploaded to the Arduino will define how it interprets the ADC values and what actions it takes as a result—whether that's adjusting the brightness of an LED, controlling the movement of a servo motor, or any number of other practical applications. The key is to map the ADC values to desired output ranges, ensuring that the user's interaction with the potentiometer translates into meaningful and predictable changes in the connected device or system. Through this understanding of the potentiometer's functionality and its interfacing with Arduino UNO R4, users can create nuanced and responsive projects, bridging the gap between user input and electronic control. With the right code and a bit of ingenuity, the potential applications are as broad as the imagination allows.